News

All articles are displayed in reverse chronological sequence. Please scroll to read all or choose a Category   

 RSS Feed

Category: Using Vision

  1. Adding your own images or videos to rubrics

    Posted on

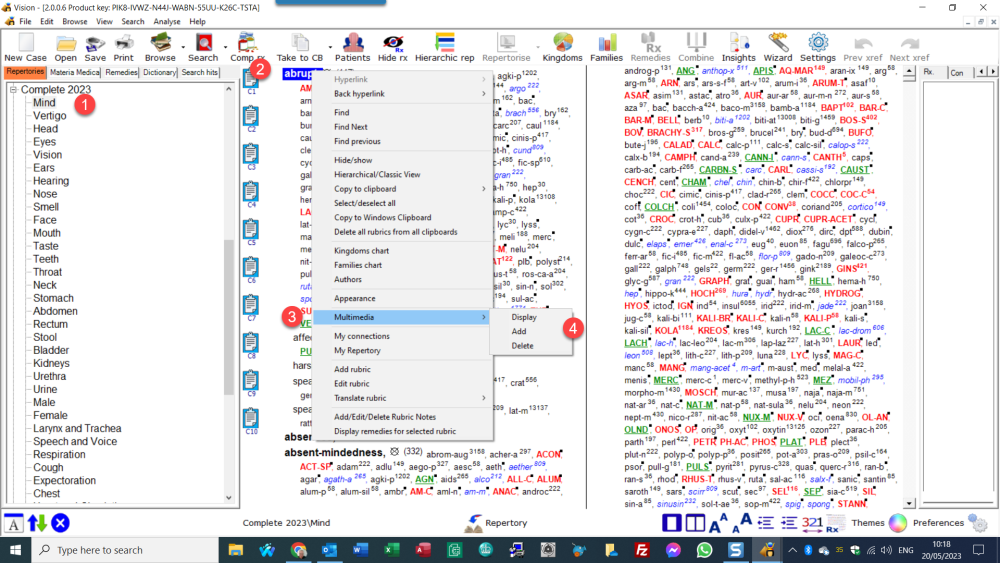
    When browsing the repertory you can now add your own images or videos to any rubric in any repertory. To add your own media file(s) select the rubric you wish to use and then either:

    Right click the mouse on the rubric (Windows) / Ctrl + Click (Mac). On the small menu that will be displayed you can select media and then whichever option is relevant. 

    Mmedia

    When adding you can select any media file in a common format (e.g. JPG, PNG, MP3 or MP4 etc). After adding a media file then the next time you are borwsing the repertory a blue microphone symbol will be displayed next to the rubric to alert you to the presence of a media file.

    You could use this feature to explain a clinical rubric with either a photo or video for future reference. Or you could add a media file which might be a video of a case in which this rubric was a prominant feature...and so on.


  2. Learning more about Families in v2.0006

    Posted on

    A new quick access feature is available in v2.0006 to make learning about families oF remedies a little easier. If you click on the Remedies tab to get a list of all the remedies in the Vision database there is now a new filter button under the tree:-

    Clicking this button will cause Vision to replace the alphabetical list of remedies with a display that shows all of the Families used in Vision. You can then browse and then click on any family to see information on the right side of the screen. Any information for the family you see displayed in blue and underlined is a clickable feature. To access any information Vision may have about any remedy click the classification information of the Family displayed in blue underline in the top left quadrant (you can use the taxanomical classifications in the first 3 rows e.g Lepidopetra or the common name of the Family  - Butterflies Moths in the example below):


    When you have selected a family you can also see a list of all remedies belonging to that family in the bottom right of the screen. And you can click any family member there to immediately 'jump' into that remedy to read more about it.


    Here is additional information on using Family data in Vision:

    You can use Vision to select a Family and get information on it as a learning exercise in addition to using Families in an analytical way when working cases

    Here are responses to previous questions in the previous version of Vision:

     "I was attending a webinar by J.Hardy on trees today and he was filtering out rubrics in that have minimum of 3 remedies in a family classification - is that possible in Vision? If so - how? Also can I filter out the same way some info just specifically on a family?"

    To do this click 'Comp Rx' on the toolbar, choose your repertory and chapter and then choose the Family to filter with (top right).  

    "Also, how can I access information on the family right away? I was thinking to check out Euphorbiaceae information and to see all the remedies in it. Went to Comp Rx but could not find that family in there. Are there different ways - see all rubrics, or just read on the family in general? Please help.

    In Vision we use Families to provide easy access to the families used in homeopathy using their common names in a simple, easy to scroll list. So you would scroll the list and select Spurges as this as the common name for Euphorbiaceae. We use ‘Kingdoms’ to provide a proper taxonomical hierarchical naming standard (APG4). So with Kingdoms you would need to choose the Plant kingdom, Eudicots and then you will see Euphorbiaceae

    There are a variety of other ways to access family info in Vision. Examples:

    If you have any rubric or group of rubrics selected in the repertory browse you can click the Families button in the toolbar to see the leading families for that condition/rubric:-


    Another obvious place is on the repertorisation chart where you can change the Presentation to Kingdom or Family (to show you the ‘leading’ families in your case):-


    abd you can drill down into any family by double clicking on any family bar:-

    and finally, a final double click on any remedy will take you to the materia medica of that remedy (if there is any mm data for that remedy).


    You can also select the Filters on the repertorisation chart to limit the display to only those rx in your desired family:-


    And you can also choose the Visionary chart in the Presentation drop down to display a ‘bubble graph’ of the leading rx in your case:

    On this chart the bigger the family 'bubble' more remedies of that family are in the case. The higher the bubble and the more to the left means that family is well indicated in your case. 
  3. Find Chapter Distribution for a Remedy

    Posted on

    In the Remedy Compare section of Vision you can now quickly see which chapters of the repertory a remedy is more present/represented in. 

    To access this run a Comp Rx for a remedy (use only 1 remedy to access this new feature!) in any repertory. 

    Once you are looking at all the rubrics your chosen remedy is present in, click the Chapter Distribution' button in the toolbar to view a chart which quickly shows you the most represented chapters for this remedy:


  4. Rule-Out feature when repertorising

    Posted on

    A new feature in Vision v2.0006 is 'Rule-Out'.

    What is it?

    This new feature allows you to specify that a rubric or rubrics should be used to rule out or remove the remedies in the marked rubrics from the repertorisation.

    If you are familiar with the Elimination approach in Vision then you know that in the rep chart this only displays remedies that are contained in the rubric(s) marked as Eliminating. If a remedy is not contained in those rubric(s) they are disregarded. Think of Rule-Out as the opposite of Eliminative. Any remedies included in a rubric marked as Rule-Out are removed from the repertorisation.

    Why might you use it?

    If you see a patient who is always very Hot, you can take into your repertorisation select the opposite (polar) Cold rubric. If you mark this rubric as a ‘Rule-Out’ rubric and analyse in this way Vision will remove all ‘cold’ remedies from the chart.

    With this technique you improve selection of remedies by removing all definitely ‘cold’ remedies. You see, many remedies are not clearly defined as "Hot" or "Cold". Many are not defined at all. Many are defined as both Hot and Cold. This way you can make sure you are focusing on all remedies that are definitely not Cold.

    Other examples could be: 

    Rule out ‘Talkative’ remedies if you see a Quiet, taciturn person
    Rule out ‘Cowardly’ remedies if you see a Strong, assertive person
    Rule out ‘Thirstless’ remedies if you see a Thirsty person

    Rule out ‘Sudden onset’ if you a person whose problems have developed Slowly

    There are many other potential rule out rubrics you could use such as:

    Aggressive
    Conscientious
    Sides (Left, Right)
    Happy/Sad

    and so on.

    How to use it

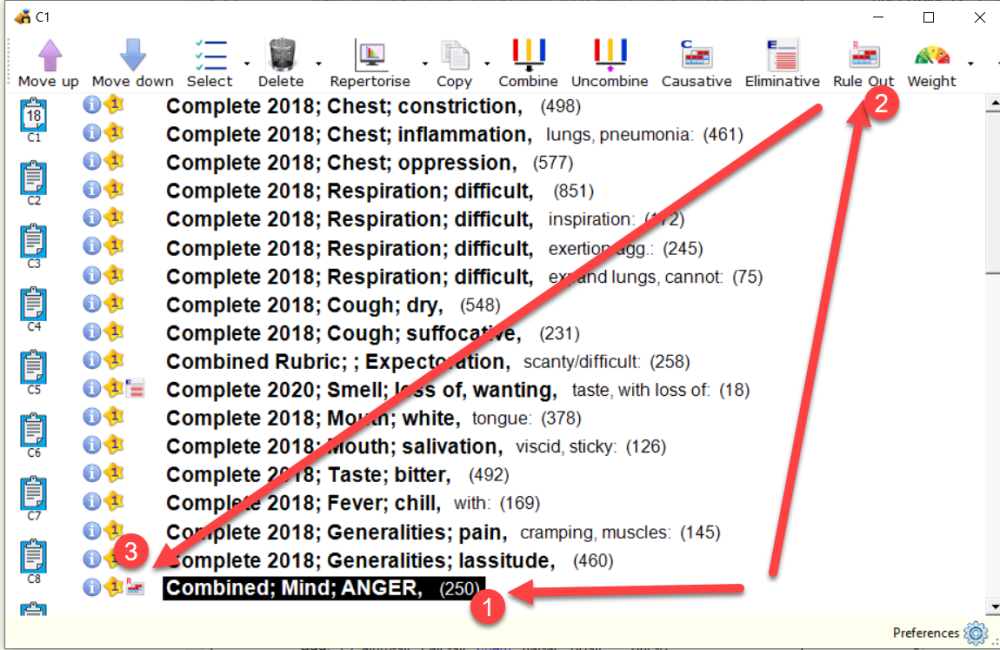
    Place your rubrics on the clipboard as usual. Select and mark any rubric to be used to rule out remedies using the the Rule-Out button as shown below:

     1

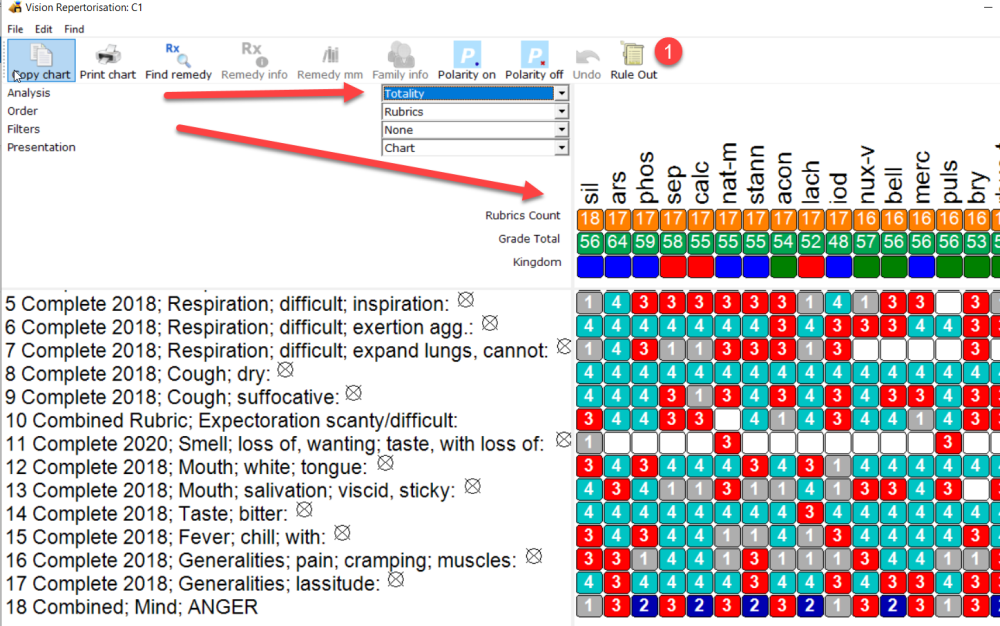
    Click Repertorise and in this example you will see remedies such as Sil, Ars & Phos as the leaders in the case. Now simply click ‘Rule Out’ in the toolbar to remove/rule out all remedies that are angry as our patient is most definitely not an angry person.
    2

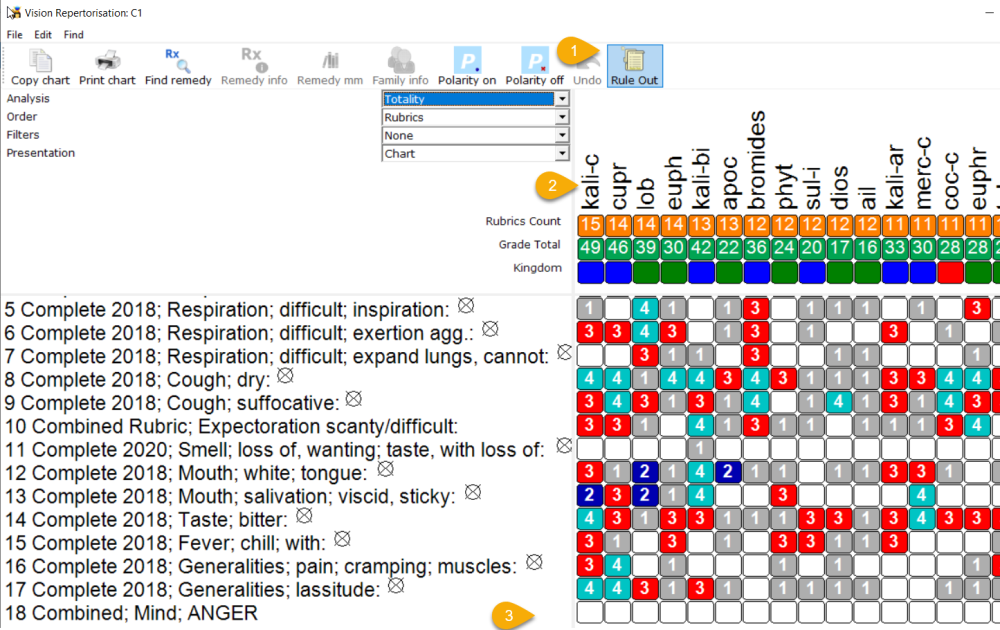
    After clicking Rule-Out’ the repertorisation is re-displayed removing all angry remedies. Now you can see the leaders have become Kali-c, Cuprum, Lobelia and Euphrasia. (Note the rule out rubrics remedies are blanked out on the chart but the rubric is retained as part of the case so you can continue re-repertorising trying other methods)

    3


  5. Analysis Methods in Vision

    Posted on

    Vision has many different ways to help you analyse/repertorise your cases. The default is always Totality but by making adjustments to your case clipboard, you can choose other ways of analysing cases.

    Totality (the default)

    This default analysis ranks remedies by how many rubrics they cover and then by their score (i.e. sum of the grades in the rubrics). This is always the initial display as it has been found most useful in practice.

    The aim of any repertorisation is to give you a set of good remedies to consider.  Often, polychrest remedies show at the top of the repertorisation chart simply due to the frequency that they appear in all of the rubrics. The polychrests can, in this way, overshadow smaller remedies that may be good candidates for use in the case.

    All other analysis types avalable in Vision aim to boost these other remedies, where appropriate, to draw them to your attention.

    You need to make use of settings on the case clipboard(s) in order to use these alternative analysis strategies. To do this on each clipboard you select and highlight the rubrics you want to work with and then click appropriate weighting buttons so that Vision knows the importance of your settings:-

    CB1

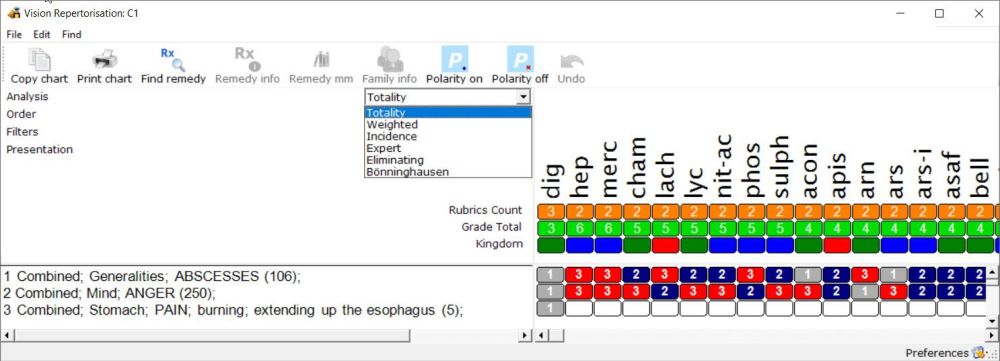
    When your clipboard is setup the way you want it click Repertorise and change the Analysis Type from Totality to whichever anslysis type you wish to investigate:

    Chart1

    Following is an explanation of the various ways you can analyse your cases.

    Weighted

    In any clipboard you can assign rubrics an 'importance' or 'weighting'. All rubrics are initially set to a weight of 1 by default but you can upgrade each up to weight 5. When you then repertorise you can choose 'Analysis' in the dropdown and select Weighted. This calculates a score for each remedy by multiplying the normal grade by the weighting and adding them all up together.

    This analysis method aims to boost all of those remedies present in the more important rubrics (as per your 'weight' or 'importance' settings). Many homeopaths are familar with using 3 weights of rubrics but Vision allows you up to a level 5 importance weighting.

    Incidence

    Using any weightings you set for rubrics in the clipboard this analysis calculates a score for each remedy based on the number of rubrics they occur in and the boost provided by any weightings you assign.  

    It is therefore a combination of Totality and Weighted to give a 'smoother' chart.

    Eliminating

    You can mark any rubric(s) on the clipboard as Eliminating. This analysis then excludes any remedies that are not in the eliminating rubrics.

    So it is as if you were saying ' I do not even want to consider remedies unless they are in this/these rubrics I have marked as eliminating rubrics'. Often there wil be only 1 rubrics that is so important you wish to mark it in this way but Vision allows you to amke any rubrics as Eliminating. 

    Some homeopaths refer to this as 'crossing' rubrics. This analysis only displays remedies that are present in every rubric you mark as Eliminating.

    Causative

    You can also mark rubrics as Causative on the clipboard. If you do, then on the repertorisation chart you can choose Expert analsis and the remedies in the causative rubrics are given a big boost

    Causative means all the patients problems started from this e.g. a Grief and can be a very important thing to consider in your analysis.

    Expert

    This is a special analysis calculation that applies up to 5 different factors (see above) and creates a score for each remedy based on all of these factors combined.  When using the Expert you definitely need to assign careful weightings to the rubrics. The Expert uses these and also has other 'behind the scenes' calculations to boost the smaller remedies. It also takes into account the size of rubrics (i.e. how many remedies are present in the rubric) looking for those Strange, Rare and Peculiar rubrics. It automatically applies any Eliminative and especially Causative settings you make for the rubrics. (Causative means all the patients problems started after this e.g. Grief).

    Expert applies all of the different ways you can analyse and puts them all together in one chart.
    You will often see smaller remedies elevated (when appropriate in the case) by using Expert. This can be a good way to see remedies other than polychrests.

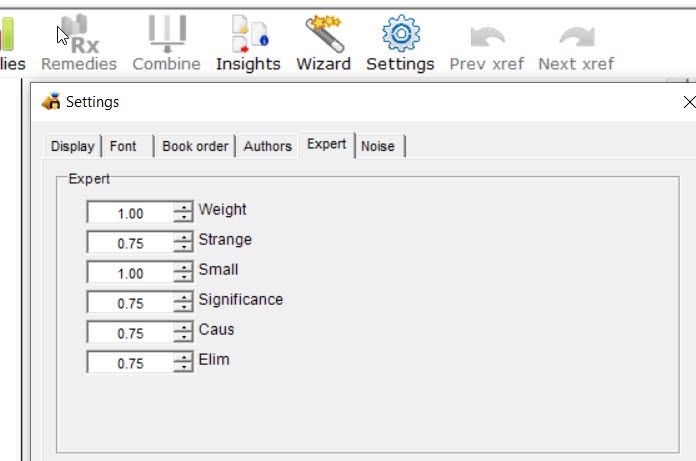
    You can adjust the settings of the Expert analysis to suit how you practice, by clicking Settings, Expert in the main toolbar. We only recommend you consider doing this if you are researching or exploring different settings that may better suit your own way of analysing cases (the default settings we have found to be very useful in everyday practice over many years )

    Expert.settings


    Multinalysis, MultiCB Analysis

    As shortcut alternatives to the normal Repertoisation button in the toolbar there are 2 other analysis methods avalable. You access these by clicking on the little black triangle on the right of the Repertorisation button on the toolbar.

    As their names imply these are simply shortcut ways to repertorise.

    MultiCB shows a quick chart of the leading remedies for each clipboard you have used. (if you have only used one clipboard in your case then this is of no use). If you do use different rubrics to seperate your rubrics (e.g. Mentals from Generals, from Locals) this MultiCB analysis shows you the leading remedies for each clipboard on a handy little screen to save you have to go in and out of the normal repertorisation chart for each clipboard.

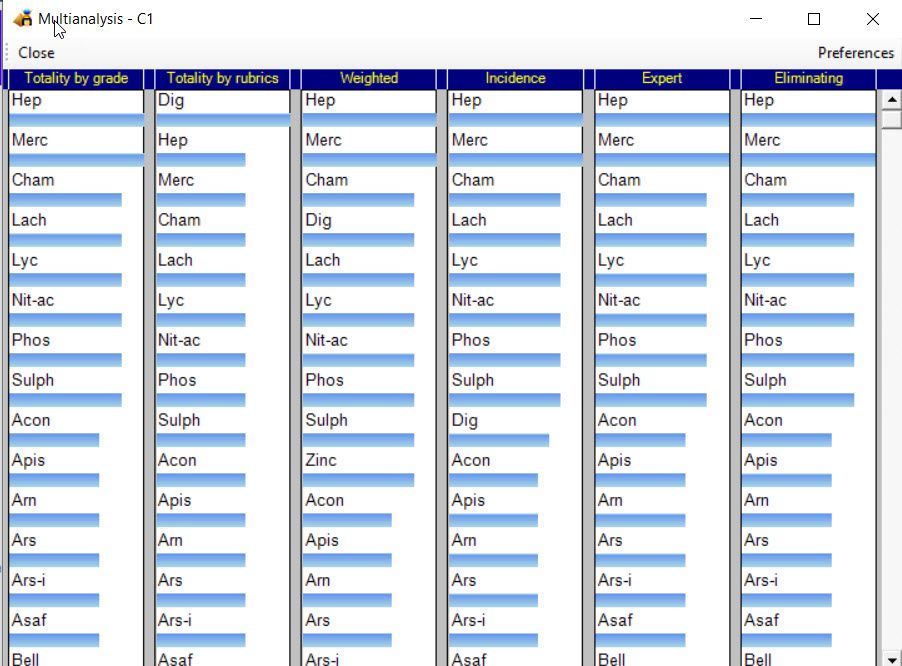
    Multianalysis shows a quick chart only for clipboard 1 rubrics showing the leading remedies for each type of analysis that is possible (as described above). It is a shortcut way of seeing the leading remedies in each analysis type all together on 1 little screen withouth having to go in and out of the main repertorisation chart.

    Ma